Introduction:
The best anterior deltoid exercises are an urgent muscle bunch in the shoulders, liable for developments like lifting the arms forward and squeezing above. To successfully target and reinforce them, integrating various activities into your exercise routine is fundamental. Key activities for the front deltoids incorporate Front Raises, which disconnect the front shoulders; Military Press, which includes squeezing loads above for by and large shoulder advancement;
Arnold Press, interestingly captivating the muscles through rotational development;
Upstanding Lines, which additionally work the snares and biceps; Slope Seat Front Raises, for centered seclusion; and Push Press, permitting heavier lifting through energy. Keep in mind that keeping up with the legitimate structure and a decent methodology is fundamental for successful outcomes and injury counteraction. Standard practice and continuous movement in these activities can fundamentally upgrade the strength and presence of your foremost deltoids.
Five best anterior deltoid exercises
- Overhead press
- Pike pushups
- Arm Circles
- Arm raises
- Handstand
Overhead press
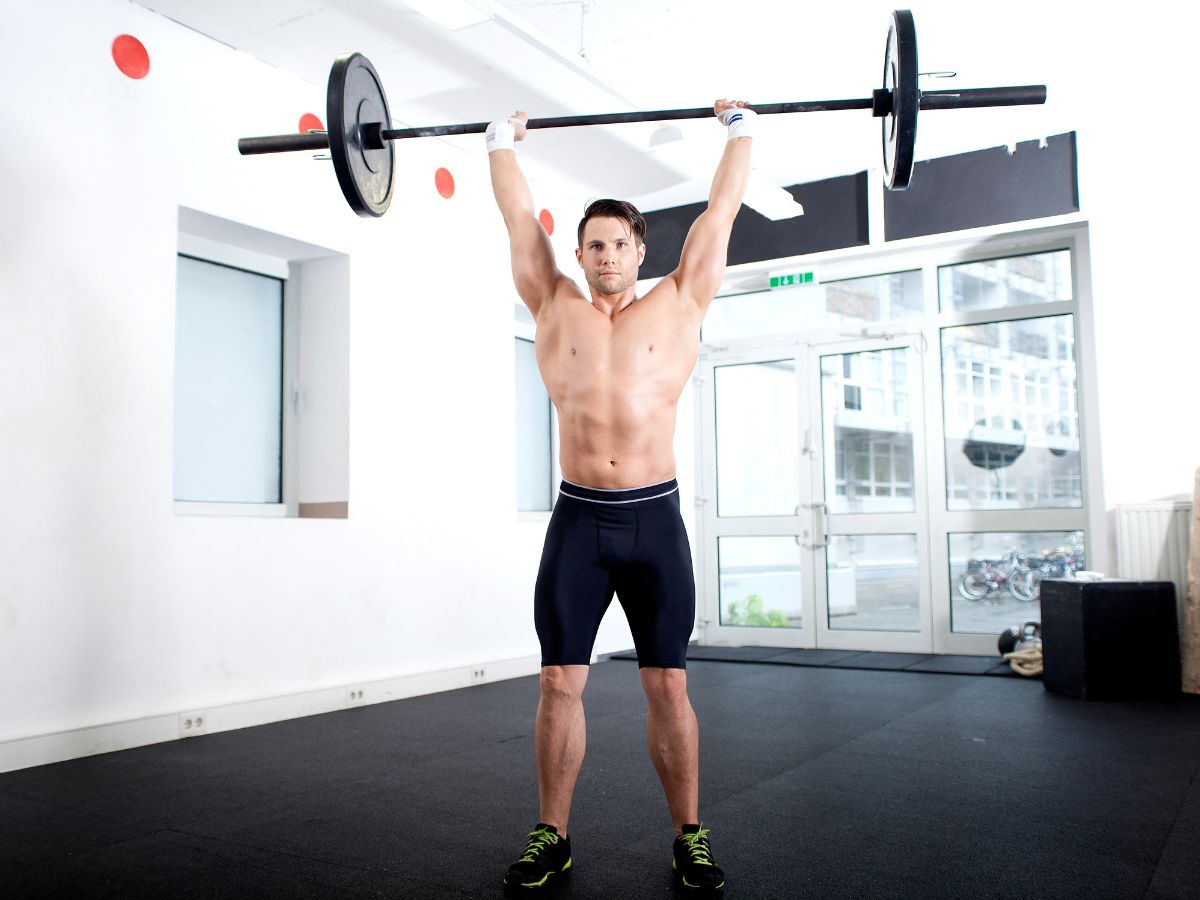
The overhead press, otherwise called the shoulder press or military press, is a chest area weightlifting practice in which the student presses a weight overhead while situated or standing. Fostering the foremost deltoid muscles of the shoulder is principally utilized. The standing form was once a part of Olympic weightlifting as a feature of the clean and press development; however, it was eliminated in 1972 because of challenges in passing judgment on legitimate procedure.
The lift is set up by taking either a barbell, a couple of dumbbells, or iron weights and holding them at shoulder level. The weight is then squeezed overhead. While the activity can be performed standing or situated, standing volunteers more muscles as more adjusting is expected to help the lift. Different varieties of the activity incorporate the push press, a comparative development that includes an extra dunking movement in the legs to increment force. An overhead press may likewise be performed singularly, with the lift being performed one-gave or in a substituting style with two hands holding a free weight or portable weight and afterward squeezing with one arm and afterward the other.
How to do Overhead press?
Beginning Position:
- Stand with your feet shoulder-width apart for security.
- Hold a hand weight or a couple of dumbbells at shoulder level. Your palms ought to look ahead (if utilizing a hand weight) or confront one another (if utilizing hand weights).
- Keep your wrists straight, your elbows pointing forward, and the weight lying on the facade of your shoulders.
Execution:
- Connect with your center by somewhat wrapping up your pelvis and propping your abs.
- Press the weight straight up above until your arms are completely expanded. Keep the weight-adjusted and stable.
- Your head ought to move normally under the bar as it climbs. This is frequently alluded to as the “head through” position, guaranteeing a straight bar way.
Completing the Lift:
- At the highest point of the lift, your body ought to frame a straight line from the loads to your feet.
- Try not to lock your knees; keep them marginally twisted to keep up with strength.
Bringing down the Weight:
- Lower the load down to the beginning situation at your shoulders in a controlled way.
Relaxing:
- Breathe in as you bring down the weight, and breathe out as you press it vertically.
Security Tips:
- Begin with lighter loads to consummate your structure.
- Guarantee you are not angling your back unnecessarily. Keep an impartial spine all through the development.
- In the case of utilizing significant burdens, having a spotter is savvy.
Pike pushups
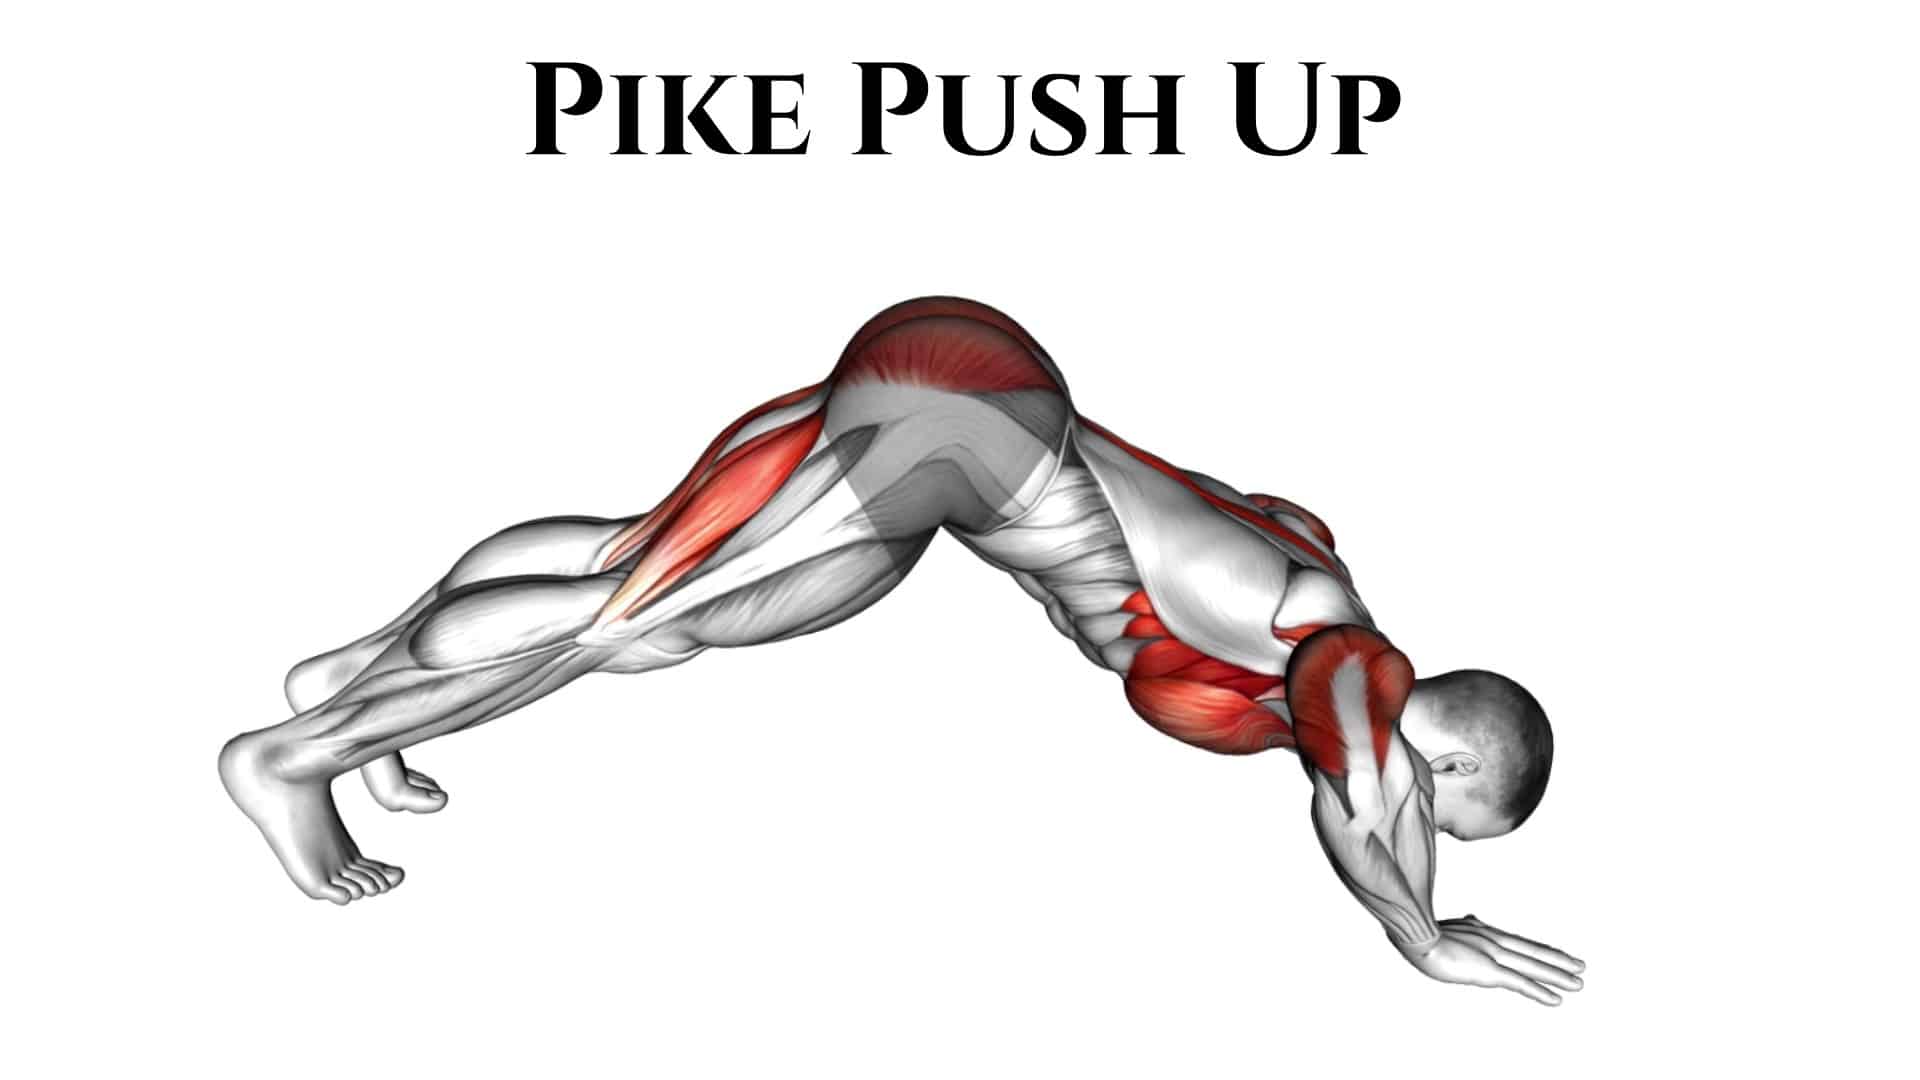
The pike pushup seems to be a concoction of Descending Confronting Canine and Dolphin Posture, and this move can develop significant fortitude.
Use it as a venturing stone to more enthusiastically moves or as an objective to help your shoulder strength. Try to ensure you keep up with appropriate structure to keep your shoulders sound — and to stay away from falling hard!
“The pike pushup is strong,” says ShaNay Norvell, a confirmed fitness coach situated in Atlanta who’s been cast a ballot as “Atlanta’s fittest competitor.”
How to do Pike pyshup?
Beginning Position:
- Start in a high plank position with your hands and feet on the floor and your body in an orderly fashion from head to impact points.
- Walk your feet towards your hands, lifting your hips towards the roof, framing a rearranged “V” shape with your body. This is the pike position.
- Your hands ought to be shoulder-width separated, and your feet can be hip-width separated for soundness. Keep your heels taken off the ground.
Execution:
- Twist your elbows to bring down your head towards the ground between your hands. Your elbows ought to twist in reverse, not erupting out to the sides.
- Keep your hips high and back straight. Your body ought to move in an orderly fashion towards the ground.
- Go down until your head is simply over the floor, then push back up to the beginning position.
Relaxing:
- Breathe out as you propel yourself back up to the beginning position.
Varieties and Movements:
To make it simpler, you can twist your knees marginally or utilize a lower height for your feet.
For more trouble, raise your feet on a case or a seat.
Security Tips:
- Keep your center connected all through the development to safeguard your spine.
- Move in a controlled way, particularly while bringing your body down, to stay away from any neck strain.
Recurrence:
- Remember pike pushups for your chest area or shoulder-centered exercises, giving your muscles time to recuperate between meetings.
Arm Circles

The arm circle is a non-weighted practice that explicitly focuses on your shoulders and upper arms. A basic activity includes stretching out your arms to the sides and making little circles in the air with your hands.
It is normal in warm-ups for both weight lifting and general games, and it is frequently performed just until you feel sufficiently consumed, as opposed to for various reps and sets. To think about them in those terms, you can believe ten-second developments to be equivalent to one set, and each circle can be equivalent to one redundancy.
How to do Arm circles?
Beginning Position:
- Stand with your feet shoulder-width separated for steadiness.
- Stretch out your arms straight out to the sides at shoulder level so your body frames a “T” shape.
Forward Circles:
- Start by moving your arms in little, controlled forward circles.
- Keep the developments smooth and consistent, zeroing in on utilizing your shoulder muscles.
- In the wake of doing this for a set span or number of redundancies, step by step, increment the size of the circles.
Invert Circles:
- Subsequent to finishing the forward circles, change to switch circles, moving your arms in a regressive movement.
- Begin with little circles, bit by bit expanding the size as you did with the forward circles.
Relaxing:
- Inhale ordinarily all through the activity. Try not to pause your breathing.
Length and Redundancies:
- You can perform arm circles for a set length, similar to 30 seconds to a moment, or count redundancies, similar to 10 to 15 circles toward every path.
- Change the terms and redundancies in light of your wellness level and objectives.
Security Tips:
- Keep your developments controlled and stay away from jerky movements to forestall shoulder strain.
- Assuming that you feel any aggravation, particularly in the shoulder joints, stop the activity.
Arm raises

Arm raises are a straightforward yet compelling activity focusing on the shoulders and upper arms. To perform them, stand with your feet shoulder-width separated, arms at your sides. Gradually raise your arms straight before you or to the sides, up to bare level, keeping them straight. Then, at that point, lower them back down in a controlled way. This exercise fundamentally works the deltoid muscles in the shoulders. It very well may be finished regardless of loads. It is brilliant for developing shoulder fortitude and strength, and improving stance, and is frequently remembered for warm-up schedules or as a component of chest area exercises.
How to do Arm raises?
Beginning Position:
- Stand with your feet shoulder-width apart for security.
- Hold your arms down at your sides, with palms confronting your body. You can do this activity regardless of load.
Front Arm Raises:
- Gradually lift your arms straight before you, keeping them broadened.
- Raise them until they are lined up with the floor and in accordance with your shoulders.
Horizontal Arm Raises:
- On the other hand, you can lift your arms out to your sides, actually keeping them straight.
- Raise them until they are level with your shoulders, shaping a “T” with your body.
Bringing down the Arms:
- Lower your arms down to your sides in a controlled way.
Relaxing:
- Breathe in as you bring down your arms.
- Breathe out as you lift your arms.
Security Tips:
- Keep your back straight, and try not to swing your body to lift the loads.
- Begin with light loads to stay away from shoulder strain, particularly in the event that you’re a novice.
Handstand
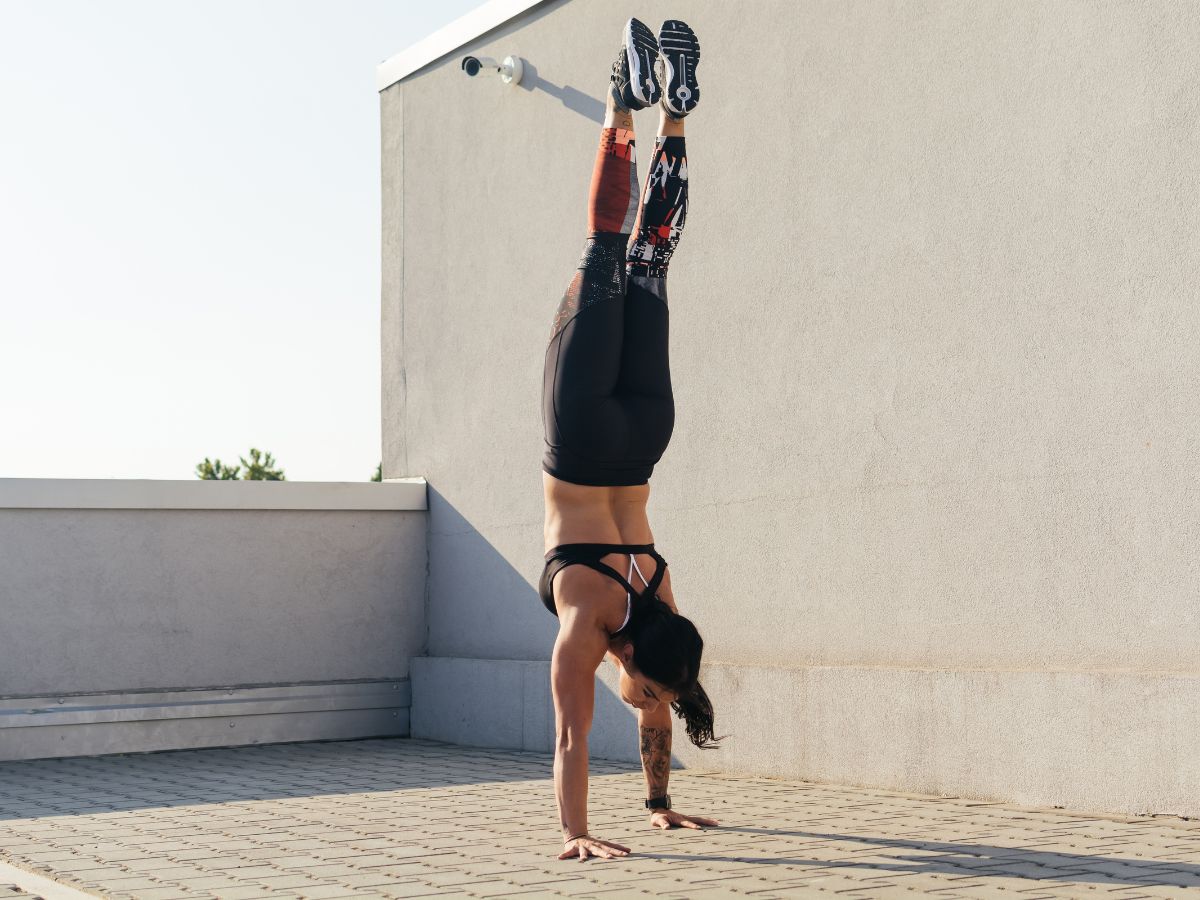
The handstand is a high-level bodyweight practice where you offset on your hands with your body upstanding and legs stretched out above you. It basically connects with the shoulders, arms, and center, requesting strength, equilibrium, and control. Handstands further develop chest area strength, especially in the shoulders and arms, improve center strength and dependability, and benefit body coordination and proprioception. This exercise is well-known in aerobatics, yoga, and workouts. Appropriate strategy and movement are urgent for security and viability. Fledglings frequently start by rehearsing against a wall for help prior to moving to an unattached handstand as they gain certainty and strength.
How to do a Handstand?
Planning and Strength Building:
- Foster adequate chest area strength, especially in the shoulders, arms, and center.
- Practice exercises like pushups, boards, and empty body hold to develop the essential fortitude and dependability.
Begin with Wall Handstands:
- Start by rehearsing against a wall to become familiar with the reversal.
- Face away from the wall, put your hands on the ground shoulder-width separated, and delicately kick up each leg in turn until the two feet lean against the wall.
- Keep your arms straight, shoulders pushed out, and your body in an orderly fashion from hands to feet.
Hand Arrangement and Body Arrangement:
- Hands ought to be shoulder-width separated; fingers spread wide for balance.
- Adjust your wrists, elbows, and shoulders. Your body ought to frame a straight line from the hands to the hips, reaching out to the toes.
Kick Up Training:
- Away from the wall, work on kicking up into a handstand, utilizing a controlled movement to lift your legs above.
- Begin with little kicks and progressively increment as you become more agreeable.
Equilibrium and Control:
- Center around keeping your center drawn in, and utilize your fingertips to make little changes for balance.
- Hold your legs together and straight, arching your foot upwards.
Relaxing:
- Keep up with consistent, controlled relaxing. Try not to pause your breathing.
Practice and Movement:
- Customary practice is vital. Begin with brief spans and slowly increment as your solidarity and equilibrium move along.
- Change from wall handstands to detached handstands as you gain certainty and control.
Security:
- Guarantee you have adequate room around you to stay away from injury.
- Consider having a spotter or rehearsing on a delicate surface while beginning.
Best anterior deltoid exercise tips
Structure Over Weight: Spotlight on appropriate structure instead of lifting weight. Foremost deltoids can actually be worked with lighter loads.
Controlled Developments: Keep away from jerky or quick developments to lessen the gamble of injury.
Full Scope of Movement: Guarantee you’re traveling through the full scope of movement to expand muscle commitment.
Adjusted Preparing: Work all pieces of the deltoid (front, sidelong, back) for adjusted shoulder improvement.
Rest and Recuperation: Permit sufficient rest for the muscles to recuperate and develop.
Consistency: Standard preparation is vital to seeing improvement.
FAQ:
What exercise works the anterior deltoid?
The overhead press and grade press are awesome for accomplishing the strength of the front delts. They are best in the 3-12 rep range. 3-6 reps utilizing Significant burden and 6-12 utilizing respectably significant burden. Front raises are by and large best with moderate to lightweight for moderate to high reps, so 8-15+ reps.
Should I train anterior delts?
Do you have to prepare front delts assuming that you seat press as often as possible? Concerning explicit work, it is likely not. Most front-delt seclusion developments aren’t required. I remembered front raises for my book, yet it’s very uncommon that it’s a slacking region.
Read More :